
3 Ways To Publish and Use an AWS Lambda Layer in Terraform
Learn about 3 different ways to build, publish, and use an AWS Lambda layer in Terraform to include additional dependencies for your Lambda functions.


Introduction
Last week, I was tasked with automating the delivery of a daily email report containing CloudWatch metrics summaries for a client. This involved performing max and mean calculations and presenting the data in a neatly formatted table. Opting for a Python-based Lambda solution seemed natural to me, leveraging the power of open-source libraries such as NumPy and tabulate. While coding and testing locally proceeded smoothly, upon testing the Lambda function on AWS, I encountered module import errors like the following:
[ERROR] Runtime.ImportModuleError: Unable to import module 'index': No module named 'numpy'
It was immediately apparent that the Lambda runtime lacked the libraries I need, so I searched for a solution which led to the use of Lambda layers. Along the way, I gathered some intriguing research insights, which prompted me to share them with the community through this blog post.
The problems that Lambda layer solves
The standard Lambda runtimes include the programming language runtime and core libraries, however many uses cases necessitates a need for additional third-party libraries. To address this extensibility challenge, AWS released the Lambda layer feature in 2018.
As explained in the AWS documentation, a Lambda layer is a zip file archive that contains supplementary code or data. Layers usually contain library dependencies, a custom runtime, or configuration files. While not demonstrated in the simple example in this blog post, a big advantage of using a layer is reusability as it can be shared across multiple functions.
About the sample scenario
For the purpose of this blog post, I have developed an example Lambda function that uses NumPy to create a list of 10 random integers between 1 and 100 and returns the average (mean) of the integers. It is far from a real-world scenario but is simple enough to illustrate the dependency on NumPy.
import numpy as np

def lambda_handler(event, context):
    numbers = []
    for i in range(10):
        numbers.append(np.random.randint(1, 100))
    avg = np.mean(numbers)
    return {
        'message': f'Average of 10 random numbers between 1 and 100: {str(avg)}'
    }
After the Lambda function is deployed successfully, testing it in the AWS Management Console should yield results similar to the screenshot below:
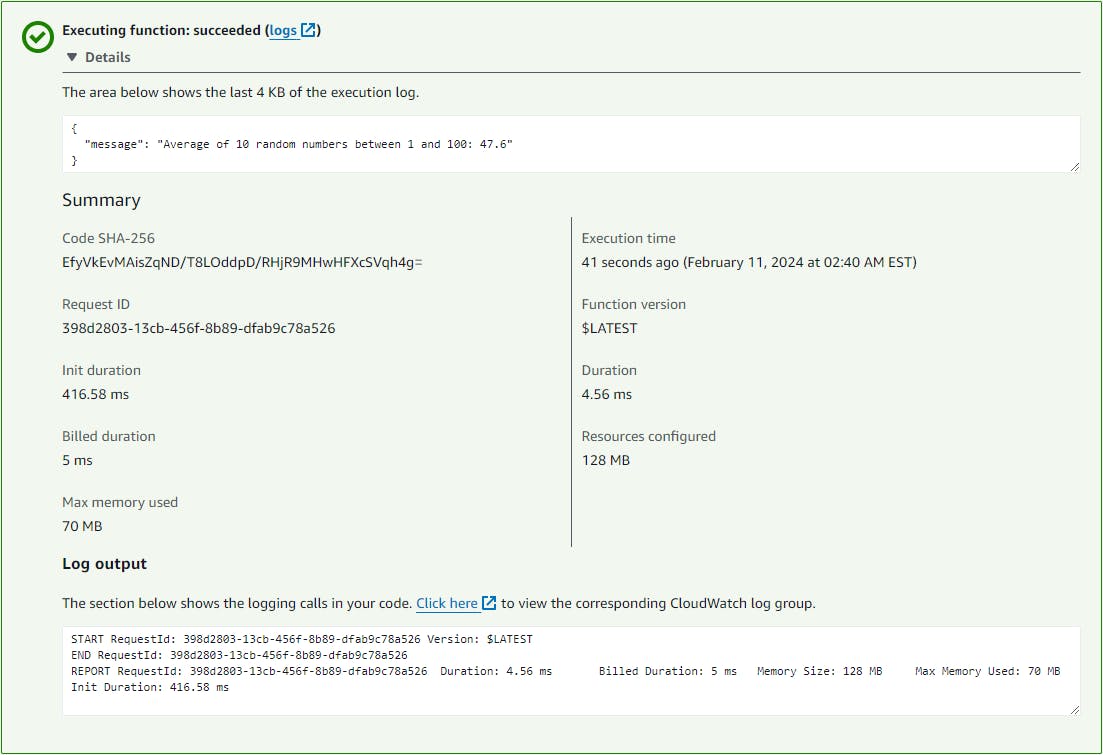
The source code for the Lambda function and the associated Terraform configurations for all three methods are available in this GitHub repository. As you follow along and deploy the configuration for each method, be sure to verify the solution using the Lambda function.
Using this sample scenario, let's examine the three different methods of building and publishing a Lambda layer using Terraform.
Method 1: Use a layer from AWS Serverless Application Repository
Why build your own layer when someone else might have already done so? The first method, which is the simplest of the three, involves the use of a layer available in the AWS Serverless Application Repository. You can browse and search for an application, including layers, that have been shared publicly by the community or published by AWS. Behind the scenes, the application is deployed using CloudFormation.
While there is no available layer specifically for NumPy, there are a few layers for pandas, a data analysis and manipulation built on top of NumPy. In particular, AWS publishes a set of AWS SDK for pandas Lambda layers for different versions of Python. Since we are using Python 3.11, aws-sdk-pandas-layer-py3-11 is what we can use to indirectly access NumPy.
1_serverless_app_repo directory in the accompanying GitHub repository.To deploy the layer, we can use the aws_serverlessapplicationrepository_cloudformation_stack Terraform resource as follows:
resource "aws_serverlessapplicationrepository_cloudformation_stack" "aws_sdk_pandas_layer" {
  name           = "aws-sdk-pandas-layer-py3-11"
  application_id = "arn:aws:serverlessrepo:us-east-1:336392948345:applications/aws-sdk-pandas-layer-py3-11"
  capabilities = [
    "CAPABILITY_IAM"
  ]
}
The application_id argument refers to the ARN of the application in the Serverless Application Repository, which can be found in the application page above. This resource exposes the outputs from the underlying CloudFormation stack via the outputs attribute. With aws-sdk-pandas-layer-py3-11, it provides a single output that represents the ARN of the deployed Lambda layer. Since outputs is a map, we will need to extract the value of the only value. The following snippet demonstrates how the value can be used in the layers argument of the aws_lambda_function resource:
resource "aws_lambda_function" "layer_example" {
  function_name = "layer-example"
  role          = aws_iam_role.layer_example.arn
  description   = "Function demonstrating the use of a Lambda layer"
  filename      = data.archive_file.layer_example_zip.output_path
  handler       = "index.lambda_handler"
  layers        = [[for k, v in aws_serverlessapplicationrepository_cloudformation_stack.aws_sdk_pandas_layer.outputs : v][0]]
  runtime       = "python3.11"
  # source_code_hash is required to detect changes to Lambda code/zip
  source_code_hash = data.archive_file.layer_example_zip.output_base64sha256
}
You should now be able to test the Lambda function layer-example and see that it returns a message with the average of the 10 random numbers.
While it takes minimal effort, you are also limited by the availability of an application that has all the required libraries at a compatible runtime version that you need. In our example, AWS SDK for pandas contains extraneous libraries which we do not need, thus using it is an overkill. This layer will also not work if you require other libraries that are not part of the layer. This brings us to the next method where we can fully build and customize our own layer.
Method 2: Manually build the layer and publish it using Terraform
The second method involves building and publishing your custom layer. First we need to craft the zip file as per Packaging your layer content. For Python, one of the acceptable formats is a zip file that contains a python directory, which in turn contains the Python library dependencies. Following this README in the accompanying GitHub repository, we will create a requirements.txt file that specifies numpy as a dependency and use the following command to download the latest version of NumPy that is compatible with the standard Lambda runtime:
pip install --platform=manylinux_2_17_x86_64 --only-binary=:all: -r requirements.txt -t .
2_pip_manual directory in the accompanying GitHub repository.After we create the zip that contains the python directory that has the downloaded NumPy distributable files, we can publish the Lambda layer in Terraform using the aws_lambda_layer_version resource as follows:
resource "aws_lambda_layer_version" "example_lambda_layer" {
  description         = "Example lambda layer"
  filename            = "${path.module}/lambda_layers/example-lambda-layer.zip"
  layer_name          = "example-lambda-layer"
  compatible_runtimes = ["python3.11"]
  source_code_hash    = filebase64sha256("${path.module}/lambda_layers/example-lambda-layer.zip")
}
We can subsequently deploy the Lambda function with this newly published layer as follows:
resource "aws_lambda_function" "layer_example" {
  function_name    = "layer-example"
  role             = aws_iam_role.layer_example.arn
  description      = "Function demonstrating the use of a Lambda layer"
  filename         = data.archive_file.layer_example_zip.output_path
  handler          = "index.lambda_handler"
  layers           = [aws_lambda_layer_version.example_lambda_layer.arn]
  runtime          = "python3.11"
  source_code_hash = data.archive_file.layer_example_zip.output_base64sha256
}
You should now be able to test the Lambda function layer-example and see that it returns a message with the average of the 10 random numbers.
This method is great in that it includes only the libraries we need, keeping things nice and clean. However, it still takes some manual work so we ought to automate the process. Thus, we now look at the final method of implementing a pipeline for it.
whl file resulted in an ImportError when the Lambda function is run. This is due to the problem described in this GitHub issue, and the recommendation is to use pip to download the libraries properly using a similar command as I've used above.Method 3: Build and publish the layer automatically using AWS CodeBuild
The last method takes a step further and use AWS CodeBuild to automatically build and publish the Lambda layer.
3_pip_codebuild directory in the accompanying GitHub repository. The 1_build subdirectory contains the Terraform configuration that creates the CodeBuild project, while the 2_deploy subdirectory contains the Terraform configuration that deploys the Lambda function. You must trigger a build manually after the CodeBuild project is completed before you apply the Terraform configuration in 2_deploy.The CodeBuild project requires a buildspec file that describes the build process. The following example serves our purpose well:
version: 0.2

phases:
  install:
    runtime-versions:
      python: 3.11
  build:
    commands:
      - mkdir python
      - cd python
      - |
        cat <<'EOF' > requirements.txt
        numpy
        EOF
      - pip install --platform=manylinux_2_17_x86_64 --only-binary=":all:" -r requirements.txt -t .
      - cd ..
      - zip -r9 $LAYER_NAME.zip python
  post_build:
    commands:
      - test "$CODEBUILD_BUILD_SUCCEEDING" = "1"
      - aws lambda publish-layer-version --layer-name $LAYER_NAME --description "Example Lambda layer" --compatible-runtimes python3.11 --zip-file fileb://${LAYER_NAME}.zip
As you can see, the build process creates the zip file in the build phase, and publishes the layer using an AWS CLI command in the post_build phase when the previous phase is successful. Now we can create the CodeBuild project with all necessary dependencies using Terraform using the snippet below:
resource "aws_iam_role" "example_lambda_layer" {
  name = "ExampleLambdaLayerCodeBuildRole"
  assume_role_policy = jsonencode({
    Version = "2012-10-17",
    Statement = [
      {
        Action = "sts:AssumeRole",
        Effect = "Allow",
        Principal = {
          Service = "codebuild.amazonaws.com"
        }
      }
    ]
  })
}

resource "aws_iam_role_policy" "example_lambda_layer" {
  name = "ExampleLambdaLayerCodeBuildPolicy"
  role = aws_iam_role.example_lambda_layer.id
  policy = jsonencode({
    Version = "2012-10-17"
    Statement = [
      {
        Action = [
          "logs:CreateLogGroup",
          "logs:CreateLogStream",
          "logs:PutLogEvents"
        ]
        Effect   = "Allow"
        Resource = "arn:${local.partition}:logs:${local.region}:${local.account_id}:log-group:/aws/codebuild/*"
      },
      {
        Action = [
          "lambda:PublishLayerVersion"
        ],
        Effect   = "Allow"
        Resource = "arn:${local.partition}:lambda:${local.region}:${local.account_id}:layer:*"
      }
    ]
  })
}

resource "aws_codebuild_project" "example_lambda_layer" {
  name         = "example-lambda-layer-build"
  description  = "Build project for example-lambda-layer"
  service_role = aws_iam_role.example_lambda_layer.arn
  artifacts {
    type = "NO_ARTIFACTS"
  }
  environment {
    compute_type                = "BUILD_GENERAL1_SMALL"
    image                       = "aws/codebuild/amazonlinux2-x86_64-standard:5.0"
    type                        = "LINUX_CONTAINER"
    image_pull_credentials_type = "CODEBUILD"
    environment_variable {
      name  = "LAYER_NAME"
      value = "example-lambda-layer"
    }
  }
  source {
    buildspec = file("${path.module}/codebuild/buildspec.yml")
    type      = "NO_SOURCE"
  }
}
Once the CodeBuild project is created, you must manually start a build to publish the custom layer. Ensure that you check the build log after the run and confirm that all phases are successful:

Next, we deploy the Lambda function that uses the layer that was published via AWS CodeBuild. Since the deployment is now separate, we must use the aws_lambda_layer_version data source to look up the ARN:
data "aws_lambda_layer_version" "example_lambda_layer" {
  layer_name = "example-lambda-layer"
}
Then we can use the ARN when provisioning the Lambda function as follows:
resource "aws_lambda_function" "layer_example" {
  function_name = "layer-example"
  role          = aws_iam_role.layer_example.arn
  description   = "Function demonstrating the use of a Lambda layer"
  filename      = data.archive_file.layer_example_zip.output_path
  handler       = "index.lambda_handler"
  layers        = [data.aws_lambda_layer_version.example_lambda_layer.arn]
  runtime       = "python3.11"
  # source_code_hash is required to detect changes to Lambda code/zip
  source_code_hash = data.archive_file.layer_example_zip.output_base64sha256
}
You should now be able to test the Lambda function layer-example and see that it returns a message with the average of the 10 random numbers.
This method is the best of the three as it aligns well with DevOps methodologies.
Summary
In this blog post, we learned about three ways of building and publishing a Lambda layer from the simplest to the most flexible using Terraform. I hope you find this information helpful as you run into this common scenario and need a Infrastructure as Code (IaC) solution. Make sure to check out my other blog posts and learn more about other AWS and Terraform tips and tricks!